


9 Inspiring DIY Wall Art Ideas for 2025

Tired of bare walls or generic, mass-produced prints? The most meaningful and striking home decor often comes from your own hands, reflecting a style that is uniquely yours. This comprehensive guide moves beyond basic suggestions to explore nine distinct DIY wall art ideas designed to transform any room from bland to beautiful. We provide actionable steps and fresh perspectives to help you create stunning, personalised pieces that command attention.
Whether you're a seasoned crafter or a curious beginner, these projects offer creative ways to express your aesthetic, add texture, and build conversation starters. We'll delve into everything from upcycled treasures like driftwood sculptures and vinyl records to intricate string art and pressed flower designs. You will learn not just how to make each piece but also how to elevate it.
We will demonstrate how incorporating high-quality, bespoke materials, such as custom-printed textiles from Maak Home, can turn a simple craft into a sophisticated work of art. Get ready to turn your blank canvas into a masterpiece that brings warmth, character, and a true sense of self to your New Zealand home. This listicle is your blueprint for creating decor that tells your story.
1. Custom Textile Art Panels
Transform high-quality, custom-printed fabric into sophisticated art panels, a brilliant method that bridges the gap between a DIY project and professional interior design. This approach allows you to create large-scale, bespoke pieces that perfectly match your decor. It's one of the most versatile DIY wall art ideas, giving you complete creative control.
Using a custom textile service lets you print any design, from abstract patterns to high-resolution photographs, onto premium fabrics. These are then stretched over simple wooden frames, creating a gallery-worthy look with minimal effort. This technique is perfect for crafting a stunning focal point in a living room or a cohesive theme across multiple rooms.
Why It Works
This method is popularised by interior designers and bespoke decor brands because it offers unparalleled customisation. You can achieve a high-end aesthetic without the high-end price tag. It's ideal for covering a large wall, creating a modern triptych with a continuous design, or even turning a treasured family photo into a unique, textured masterpiece.
Actionable Tips for Success
- Fabric Choice: Select a heavyweight fabric like canvas or linen for a premium feel and durability.
- Test First: Always order samples to check colours and textures in your home’s lighting. Explore the wide range of custom fabrics from Maak Home to find the perfect base for your project.
- Frame Construction: Build a simple pine frame, known as a 'stretcher bar', for your canvas.
- Even Tension: Use a staple gun, starting from the centre of each side and working outwards to ensure the fabric is taut and wrinkle-free.
- Professional Finish: Fold the corners neatly for a clean 'gallery wrap' look where the design continues around the sides of the frame.
2. Pressed Flower Shadow Boxes
Capture the delicate beauty of nature by creating pressed flower shadow boxes, a timeless botanical art form that brings an organic, personal touch to your walls. This technique involves preserving fresh flowers and foliage by pressing them, then arranging the dried specimens in dimensional frames. It’s a wonderful way to create deeply personal DIY wall art ideas that can commemorate a special occasion, like a wedding, or simply celebrate the beauty of your garden.
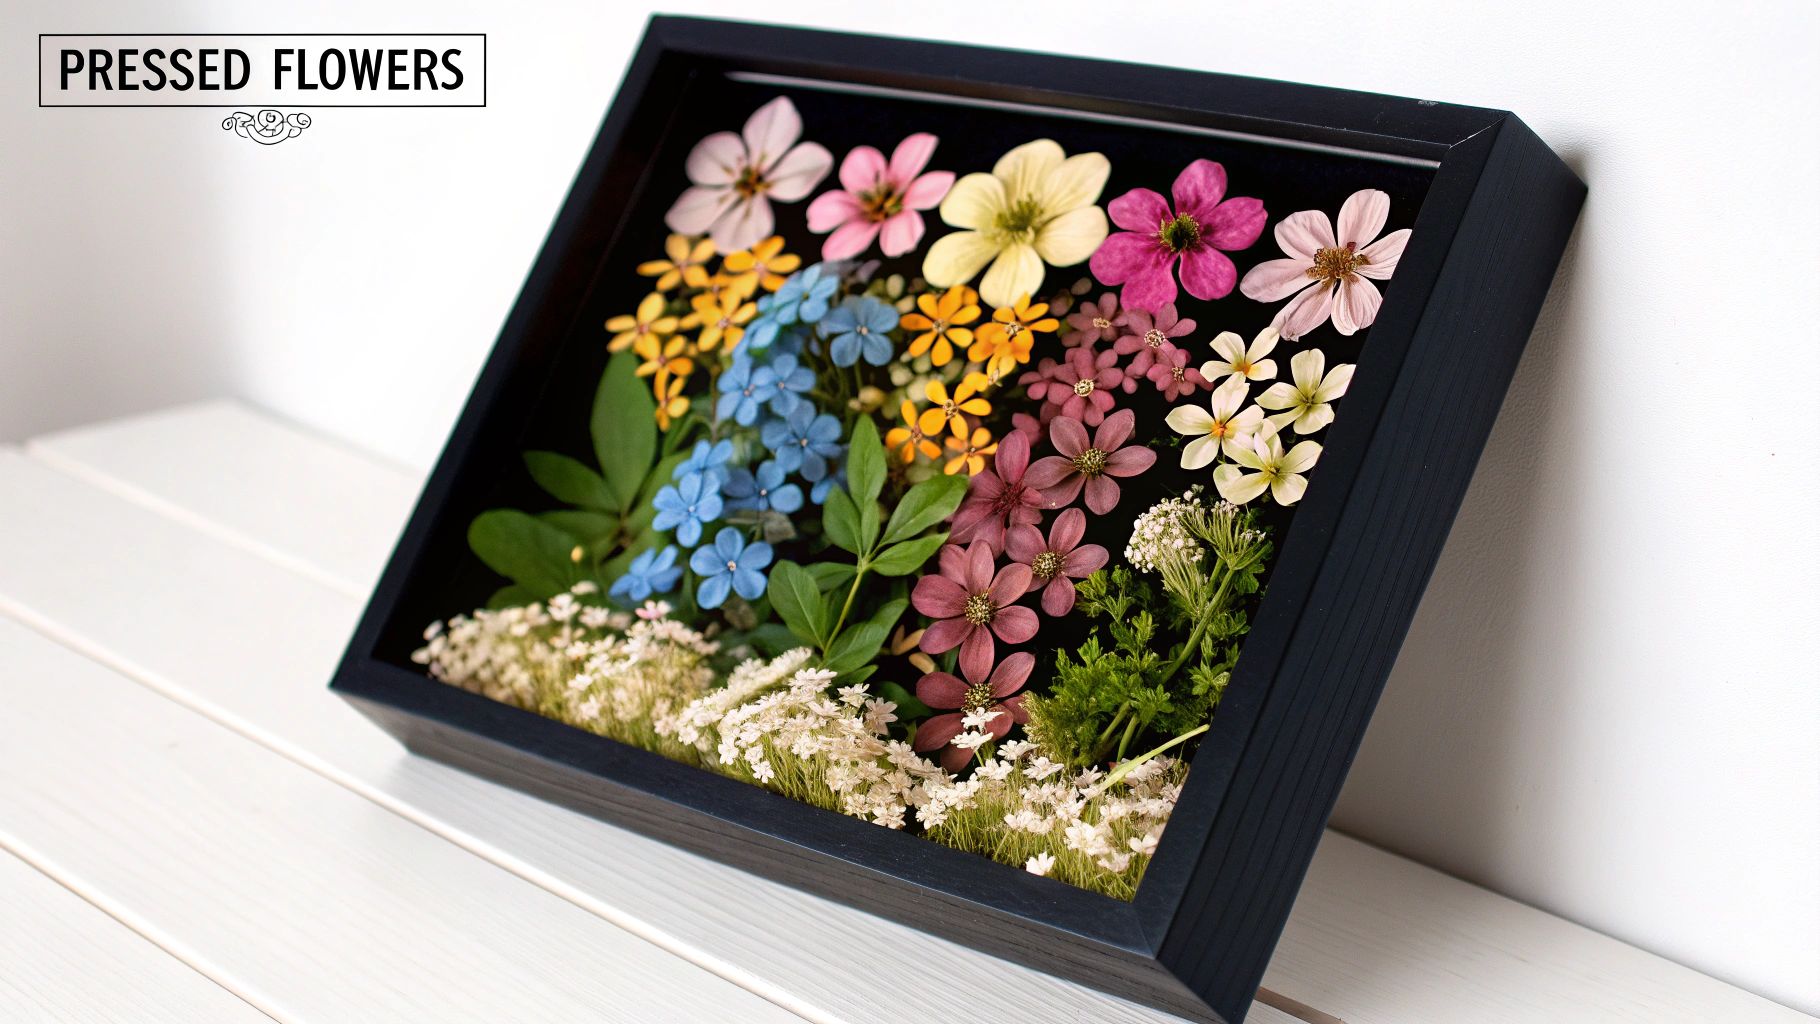
This method has seen a modern revival, moving beyond a simple craft to a sophisticated decor element. Artists and designers arrange pressed botanicals in minimalist floating frames or traditional shadow boxes to create stunning, intricate compositions. These pieces work beautifully as standalone art or grouped together to form a gallery wall that tells a story of seasons and memories.
Why It Works
Pressed flower art offers a unique connection to the natural world and a sense of permanence for fleeting beauty. Popularised in the Victorian era and revitalised by modern botanical artists, this technique is perfect for adding texture and a touch of nostalgia to any space. It’s an accessible project for all skill levels, allowing you to create high-end looking decor, like the custom botanical pieces seen in Williams Sonoma or from popular Etsy artists.
Actionable Tips for Success
- Optimal Picking Time: Collect flowers in the late morning once the dew has completely evaporated to minimise moisture and prevent mould.
- Pressing Technique: Place flowers between two sheets of parchment paper inside a heavy book. Change the paper weekly to absorb moisture effectively.
- Protect Your Art: Use frames with UV-protective glass to significantly slow down the natural fading of the flowers' colours over time.
- Secure Arrangement: Use a tiny dab of clear craft glue applied with a toothpick to secure the delicate, dried botanicals to the backing paper.
- Seal for Longevity: Ensure your shadow box or frame is properly sealed to protect the arrangement from humidity and dust, preserving your creation for years to come.
3. Macrame Wall Hangings
Introduce a touch of bohemian texture and artisanal charm to your space with macrame wall hangings. This timeless craft uses various knotting techniques to transform simple cord into intricate, sculptural textile art. It's a standout among DIY wall art ideas for its ability to add warmth, depth, and a handmade feel to any room.
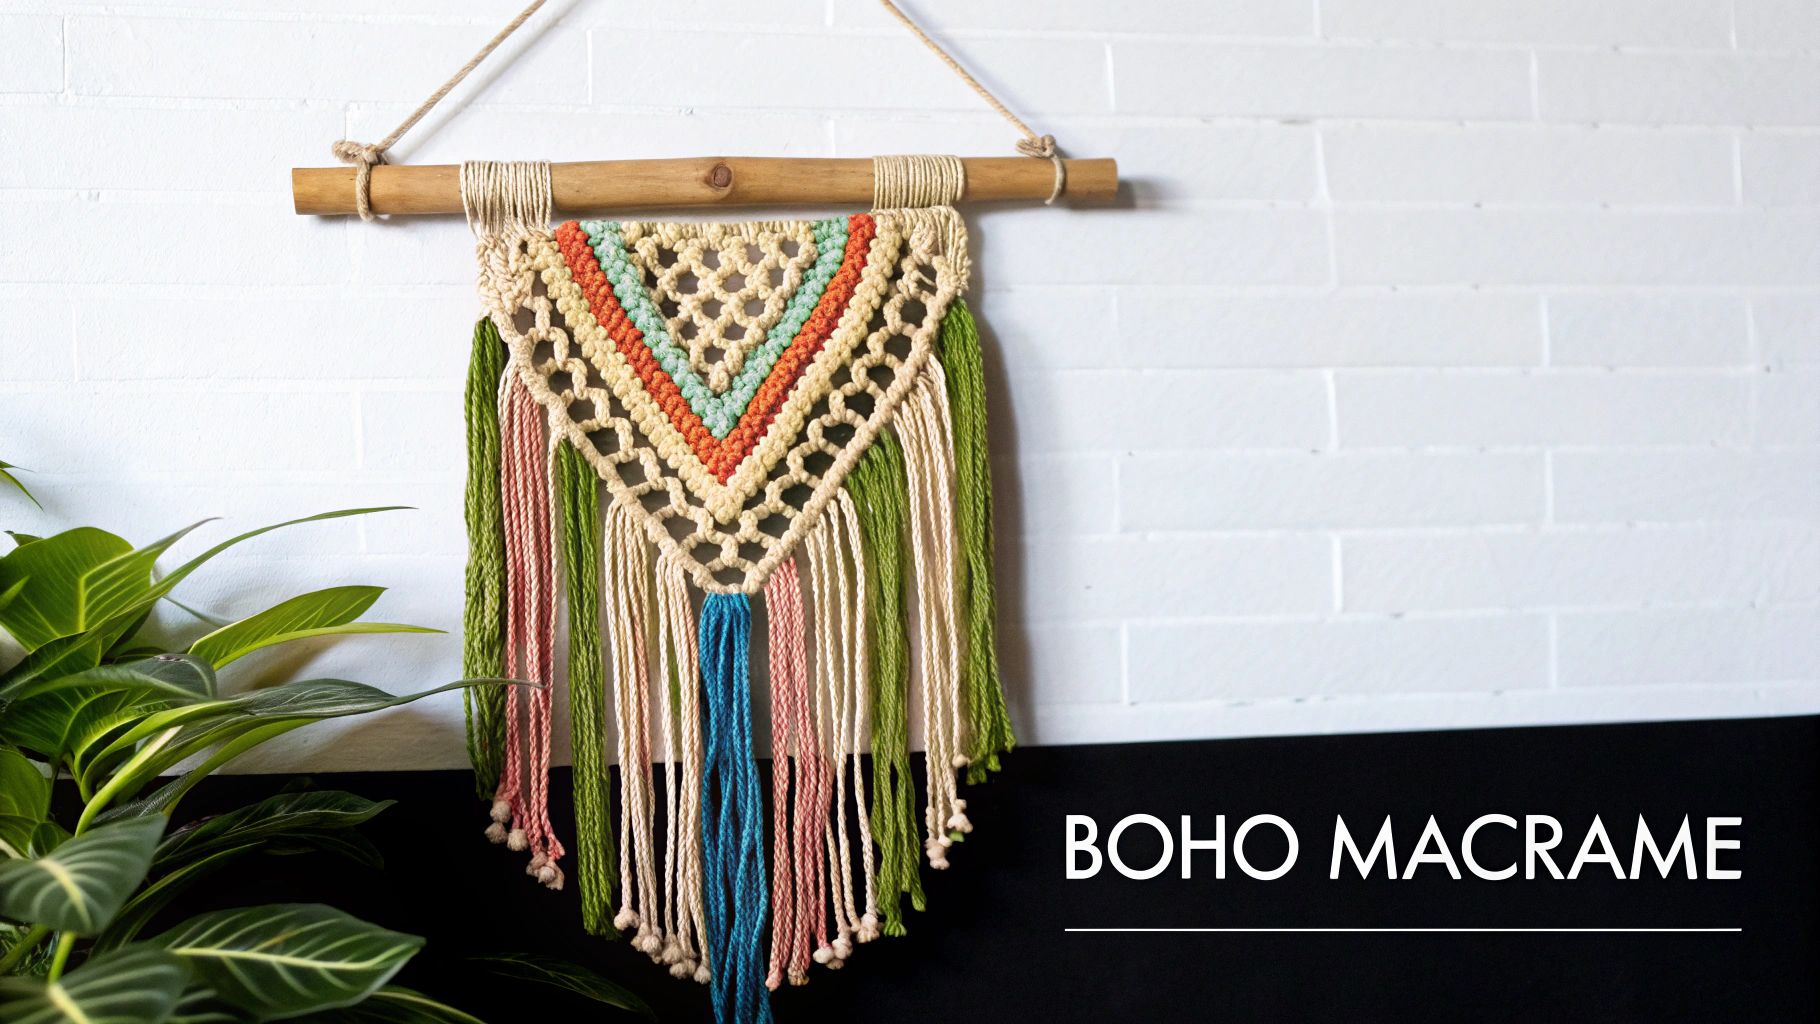
The resurgence of this 1970s favourite has been fuelled by its calming, meditative process and visually stunning results. Modern macrame ranges from minimalist geometric patterns to large, elaborate pieces that serve as a room's primary focal point. All you need to begin is a dowel, cord, and a foundational understanding of a few key knots.
Why It Works
Macrame is incredibly effective at softening modern or minimalist interiors by introducing natural texture and organic forms. Its popularity in high-end decor and bespoke properties, like those found on Airbnb, demonstrates its appeal. The tactile nature of the knotted cord creates shadows and depth, making a wall feel more dynamic and visually engaging than a flat print.
Actionable Tips for Success
- Choose the Right Cord: For beginners, a 4mm single-strand cotton cord is ideal as it's soft on the hands and easy to knot.
- Create a Workspace: Secure your dowel to a macrame board, clothing rack, or even a clipboard to maintain consistent tension while you work.
- Master the Basics: Focus on learning the three fundamental knots: the lark's head, the square knot, and the double half-hitch. Countless online tutorials can guide you.
- Prepare Your Cords: Measure and cut all your required lengths of cord before you begin knotting to ensure a smooth, uninterrupted workflow.
- Perfect the Fringe: For a professional, tidy finish on any fringed ends, gently comb them out with a fine-tooth comb or a pet brush.
4. String Art Geometric Designs
Discover the captivating intersection of mathematics and artistry with string art, a technique that uses coloured thread wrapped around nails to form intricate geometric patterns. This method transforms a simple wooden board into a dynamic and textured 3D masterpiece. It’s a wonderfully tactile project and stands out among DIY wall art ideas for its ability to create complex visuals from simple, intersecting lines.
Originally an educational tool developed by mathematician Mary Everest Boole to teach children geometry, string art has evolved into a sophisticated decor form. Modern artists like Gabriel Dawe create large-scale, rainbow-hued installations, showcasing the medium's potential. This technique allows you to craft everything from minimalist shapes to elaborate, layered images with stunning visual depth.
Why It Works
String art is incredibly effective because it creates a sense of movement and dimension that flat artwork cannot. The layering of threads produces shifting colours and shadows, making the piece feel alive as you view it from different angles. It is perfect for adding a focal point with a handmade, yet structured, feel to a modern office, a child's bedroom, or a minimalist living space.
Actionable Tips for Success
- Plan Your Pattern: Use a paper template taped onto your wood base to ensure precise and symmetrical nail placement.
- Prevent Splitting: Pre-drill small pilot holes for each nail. This is crucial for preventing the wood from splitting, especially with more intricate designs.
- Maintain Tension: Keep the thread taut as you wrap it. Consistent tension is key to achieving sharp lines and a clean, professional finish.
- Colour Contrast: Select thread colours that contrast sharply with your background board to make the geometric design pop.
- Start Simple: If you're new to string art, begin with a basic shape like a star or spiral before moving on to more complex, multi-layered images.
5. Fabric Scrap Collage Canvas
Embrace sustainability with a fabric scrap collage, a creative technique that turns textile offcuts and remnants into a stunning piece of textured wall art. This eco-conscious method involves arranging fabric pieces by colour, pattern, or texture onto a canvas to build an abstract or representational image. It's an artistic and resourceful approach to DIY wall art ideas, perfect for giving new life to otherwise discarded materials.
Popularised by quilting communities and the upcycling movement, this technique uses decoupage glue or a clear medium to adhere the fabric pieces. The final result is a vibrant, multi-layered composition that celebrates texture and colour. It's a fantastic project for using samples from previous projects or treasured scraps from old garments, turning memories into a visual masterpiece.
Why It Works
This method is highly celebrated because it's both an artistic expression and an act of environmental responsibility. It allows for complete creative freedom, from minimalist geometric designs to complex, painterly landscapes. The technique is similar in spirit to applying different patterns together, much like you would with wallpaper, but on a more contained and artistic scale. For insights on handling different materials and adhesives, our guide on applying removable wallpaper shares useful principles.
Actionable Tips for Success
- Prepare Your Fabrics: Always pre-wash and iron your fabric scraps to prevent colours from bleeding and to ensure they lie flat.
- Plan Your Composition: Sketch out your design or arrange the pieces on the canvas without glue first. This helps you finalise the colour flow and layout.
- Use Sharp Scissors: Use dedicated fabric scissors to get clean, crisp edges that won't fray easily.
- Apply Medium Evenly: Use a paintbrush to apply a thin, even layer of decoupage medium to the canvas, place the fabric on top, and then seal it with another thin layer over the fabric.
- Allow for Drying Time: Let the collage dry completely for at least 24 hours. This ensures all layers are fully bonded and secure before you display your art.
6. Branch and Driftwood Sculptures
Bring the serene beauty of the outdoors inside by creating stunning three-dimensional wall sculptures from found branches, driftwood, and twigs. This natural art form transforms organic materials into sophisticated installations, celebrating the unique shapes, textures, and history of each piece of wood. It's one of the most eco-friendly DIY wall art ideas, turning a walk on the beach or in the forest into a treasure hunt for your next masterpiece.
Inspired by the environmental art of Andy Goldsworthy and the relaxed vibe of coastal decor, these sculptures can range from a single, dramatic branch to a complex arrangement of smaller pieces. By mounting them directly onto the wall, you create a piece with depth and shadow that interacts with the light in your room, adding a dynamic and organic element to your space.
Why It Works
This method connects your home directly to the natural world, introducing raw, tactile elements that soften modern interiors and enhance rustic or Scandinavian aesthetics. It's a cost-effective way to create large-scale art with significant visual impact. This approach aligns perfectly with biophilic design principles, which focus on strengthening the human-nature connection within our living spaces. Learn more by exploring some sustainable interior design ideas that complement this natural ethos.
Actionable Tips for Success
- Clean and Prepare: Thoroughly clean all wood to remove dirt and pests. Allow it to dry completely for several weeks indoors to prevent warping or cracking after installation.
- Secure Mounting: Use appropriate hardware for the weight of your sculpture. Heavy-duty wall anchors, screws, or invisible mounting brackets are essential for safety and stability.
- Consider Treatment: To preserve the wood's colour and prevent decay, you can apply a clear matte sealant. For a different look, consider whitewashing or staining the wood.
- Strategic Arrangement: Group pieces in odd numbers (e.g., three or five) for a more balanced and visually appealing composition.
- Placement is Key: Position your sculpture where it can catch natural light to create interesting shadows that change throughout the day, adding another layer to the artwork.
7. Photo Transfer onto Wood
This technique offers a deeply personal way to create rustic, sentimental art by transferring your favourite photographs directly onto wood. The process uses a gel medium to lift the ink from a laser-printed photo and infuse it into the wood's surface, allowing the natural grain to show through. This results in a beautiful, vintage effect that makes each piece truly one-of-a-kind.
Popularised by Etsy artists and DIY television shows, this method turns personal memories into tangible, handcrafted decor. It's an excellent way to create custom gifts, memorialise special occasions like weddings, or build a gallery wall of family moments with an organic, cohesive feel. The end product has a warm, weathered quality that store-bought prints can't replicate.
Why It Works
Photo transfers onto wood are powerful because they blend the personal significance of a photograph with the natural beauty of timber. The slight imperfections and the visible wood grain add character and a sense of history, making the image feel integrated with the material itself. It's an ideal project for achieving the vintage aesthetic seen in brands like Restoration Hardware, but with a personal touch.
Actionable Tips for Success
- Print correctly: Use a laser printer and standard copy paper. Inkjet prints will smudge and will not transfer properly. Remember to mirror the image before printing if it contains text.
- Apply Medium Evenly: Coat the wood surface with a thin, even layer of gel medium. Too little and the image won't stick; too much and it may bubble or obscure details.
- Patience is Key: Allow the transfer to dry completely for at least 8-12 hours, or ideally 24 hours, before attempting to remove the paper backing.
- Gentle Removal: Use a spray bottle with water and your fingertips or a soft cloth to gently rub away the paper pulp. Rushing this step can damage the transferred image.
- Seal Your Work: Protect your finished art with a coat of clear polyurethane or acrylic sealer. This will safeguard it from moisture and enhance the colours.
8. Paper Quilling Art
Rediscover the delicate art of paper quilling, a centuries-old technique that transforms simple paper strips into intricate, three-dimensional masterpieces. Also known as paper filigree, this method involves rolling, shaping, and glueing paper to create stunningly detailed designs. It’s an accessible and mesmerising DIY wall art idea that adds texture and sophisticated detail to any space.
From elegant monograms to sprawling abstract patterns and intricate nature scenes, quilling offers boundless creative potential. The resulting artwork has a unique textural quality, casting subtle shadows that shift with the light, adding depth and visual interest to your walls. This technique can be scaled from small, framed pieces to larger, more ambitious installations.
Why It Works
Paper quilling stands out because it achieves a high level of detail and a sculptural effect with inexpensive materials. Its revival in contemporary art, championed by artists like Yulia Brodskaya, has showcased its potential for creating complex, large-scale works. It's perfect for creating a focal point that is both intricate and personal, offering a handmade charm that mass-produced art cannot replicate.
Actionable Tips for Success
- Invest in a Tool: A slotted quilling tool is essential for creating tight, consistent coils, which form the basis of most designs.
- Start Simple: Master basic shapes like tight circles, teardrops, and marquises before progressing to more complex and composite designs.
- Choose Quality Paper: Use acid-free paper to prevent yellowing and ensure your artwork remains vibrant and lasts for years.
- Work in Good Light: Proper illumination is crucial to reduce eye strain when working with such fine, detailed elements.
- Frame for Protection: Once complete, frame your quilled art behind glass to protect it from dust, moisture, and physical damage.
9. Vinyl Record Wall Art
Turn old or unplayable vinyl records into nostalgic and striking wall art, an excellent upcycling project for music lovers and vintage enthusiasts. This method breathes new life into scratched LPs, transforming them into unique decorative pieces. It's one of the most personal DIY wall art ideas, perfect for adding character to a music room, home office, or living space.
The creative possibilities are vast, ranging from simple painted designs to intricate cut-out silhouettes and even heat-moulded bowls and sculptures. By painting, layering, or carefully cutting the vinyl, you can create custom pieces that reflect your favourite bands, musical eras, or artistic tastes. This approach is commonly seen in music venues and is a popular craft on platforms like Etsy.
Why It Works
This idea is celebrated within the upcycling movement and by music memorabilia collectors because it repurposes an iconic object into something visually compelling. The distinct circular shape and glossy black surface provide a unique canvas. It's an affordable and eco-conscious way to create a themed gallery wall or a single, standout piece that tells a story and sparks conversation.
Actionable Tips for Success
- Source Wisely: Use damaged or common records from op shops rather than valuable collectibles. Always research a record's value before altering it.
- Surface Prep: For painting, lightly sand the record with fine-grit sandpaper and apply a primer to ensure the paint adheres properly.
- Safe Shaping: If heating a record to mould it, do so in a well-ventilated area on a low oven heat (around 100°C) and for very short periods to avoid releasing fumes.
- Clean Cuts: For creating silhouettes, a hot knife or a specialised craft cutting tool will provide cleaner lines than standard scissors.
- Creative Display: Group records of different sizes (LPs, 45s) or paint them in a cohesive colour scheme to create a dynamic and organised display.
DIY Wall Art Ideas Comparison Guide
| Wall Art Type | Implementation Complexity 🔄 | Resource Requirements ⚡ | Expected Outcomes 📊 | Ideal Use Cases 💡 | Key Advantages ⭐ |
|---|---|---|---|---|---|
| Washi Tape Gallery Wall | Low - Beginner; quick setup (1-3 hrs) | Minimal; affordable tape rolls ($10-30) | Removable, colorful 2D designs; renter-friendly | Renters, frequent decor changers, DIY beginners | Damage-free, fast, endless design options |
| Pressed Flower Shadow Boxes | Medium - Intermediate; long pressing (3-6 weeks) | Requires fresh flowers, shadow box frames ($15-50) | Dimensional, personalized botanical art with preserved flowers | Nature lovers, sentimental art, seasonal displays | Highly personalized, meaningful, cost-effective using garden flowers |
| Macrame Wall Hangings | Variable - Beginner to Advanced; 4-12 hrs | Cotton/jute cords, basic knotting tools ($20-60) | Textured, bohemian textile sculptures | Boho decor enthusiasts, sustainable material users | Meditative craft, customizable size/design, natural materials |
| String Art Geometric Designs | Medium - Intermediate; 3-8 hrs | Nails, colored thread, wood/canvas base ($15-40) | Precise geometric/optical illusion art | Educational use, math/art fusion, geometric decor | Teaches math concepts, affordable, complex looks with simple techniques |
| Fabric Scrap Collage Canvas | Medium - Beginner to Intermediate; 4-10 hrs over days | Textile scraps, adhesive mediums, canvas ($10-25 + scraps) | Textural, sustainable, layered abstract or representational art | Upcycling advocates, textile artists, environmentally conscious art | Sustainable, cost-effective, visually rich |
| Branch and Driftwood Sculptures | Low to Medium - Beginner to Intermediate; 2-6 hrs including collection | Found natural wood, mounting hardware ($5-30) | Unique 3D organic wall sculptures | Nature-inspired decor, rustic/coastal interiors | Free/low-cost materials, one-of-a-kind, natural aesthetic |
| Photo Transfer onto Wood | Medium - Intermediate; 3-5 hrs over 2 days | Wood panel, gel medium, laser-printed photos ($20-40) | Vintage, rustic photo art with natural wood texture | Personalized gifts, memory displays | Personal, vintage look, durable when sealed |
| Paper Quilling Art | High - Intermediate to Advanced; 8-20 hrs | Colored paper strips, quilling tools ($15-35) | Intricate, 3D sculptural paper art | Fine motor skill development, detailed statement art | Detailed, inexpensive materials, precise color control |
| Vinyl Record Wall Art | Low to Medium - Beginner to Intermediate; 2-6 hrs | Old/damaged vinyl records, cutting/painting supplies ($5-20) | Nostalgic, circular upcycled art | Music lovers, retro decor, upcycling projects | Recycles old records, music-themed appeal, sturdy base |
From Blank Space to Your Personalised Place
We've explored a vibrant collection of diy wall art ideas, each offering a unique pathway to transform your home. From the clean, modern lines of a Washi Tape Gallery Wall to the rustic, organic charm of Driftwood Sculptures, the possibilities are as limitless as your imagination. The journey from a blank wall to a personalised masterpiece is one of creativity, resourcefulness, and personal expression.
The true power of these projects lies not just in their aesthetic appeal, but in the story they tell. Whether you’re pressing flowers from your own garden, transferring a cherished family photo onto wood, or weaving a macrame hanging with your own hands, you are embedding your personal narrative directly into your home’s decor. This process turns a simple house into a deeply personal sanctuary, a space that reflects your history, passions, and unique style.
Key Takeaways for Your Creative Journey
To ensure your project is a success, remember these core principles:
- Embrace Your Style: The most impactful DIY art is a reflection of you. Don't feel pressured to follow a trend that doesn't resonate. Choose a project like String Art for its geometric precision or a Fabric Scrap Collage for its free-form creativity, based on what genuinely excites you.
- Materiality Matters: The materials you choose define the final piece. The natural texture of wood, the delicate nature of pressed flowers, or the soft, tactile quality of custom textiles all contribute to the artwork's overall feel and impact.
- Start with a Plan: Before you begin, visualise the final outcome. Consider the scale of the piece, the colour palette of the room, and how the new art will interact with existing decor. A little planning prevents frustration and ensures a cohesive, professional-looking result.
Your Actionable Next Steps
Feeling inspired? It’s time to move from planning to creating. Your first step is to select one of the diy wall art ideas from this list that sparks your interest and aligns with your skill level. Next, gather your materials, dedicating a specific workspace for your project. Remember, the goal is not perfection but expression. Allow yourself the freedom to experiment, to make mistakes, and to enjoy the creative process.
By taking on one of these projects, you are doing more than just filling an empty wall. You are investing your time and energy into making your environment a more beautiful, inspiring, and authentic representation of who you are. The satisfaction of looking at a piece of art and saying, "I made that," is a reward in itself, fostering a deeper connection to your living space. So, roll up your sleeves, unleash your creativity, and start building a home that tells your unique story, one handmade piece at a time.
Ready to elevate your DIY projects with perfectly matched, custom-designed textiles? Explore the possibilities with Maak Home, where you can print your own designs on a range of high-quality, sustainable fabrics. Bring your unique vision for fabric-based wall art to life by visiting Maak Home today.


