


Peel and Stick Wallpaper Installation: DIY Made Simple

Why Peel and Stick Wallpaper Changes Everything
Let’s be honest: the thought of traditional wallpapering can be a bit of a nightmare. Buckets of glue, soggy paper, and the finality of a permanent design are enough to make anyone second-guess a room makeover. But what if you could get that stunning feature wall in just an afternoon, without the mess or long-term stress? This is where peel and stick wallpaper completely changes the game for home decorators.
The magic is in its simplicity. Think of it as applying a giant, high-quality sticker to your wall. This is a game-changer not just for renters who want to put their stamp on a place without losing their bond, but also for homeowners who love to switch up their decor with the seasons. The peel and stick wallpaper installation process gets rid of the two biggest hurdles: the fear of making a mistake and the feeling of permanence.
The Modern Advantage
A few years back, self-adhesive wallpapers had a reputation for being a bit naff—with poor stickiness and uninspired designs. That’s all changed. Today's options are incredibly durable, with sophisticated textures and a huge range of patterns that easily rival traditional papers. This jump in quality hasn't gone unnoticed. The global market for these products was valued at USD 2.1 billion in 2023 and is expected to more than double by 2033. You can read more about this shift in the full market insights on peel and stick wallpaper growth.
It’s not just DIY fans jumping on board; professional decorators are also seeing the benefits. It allows for quicker project turnarounds and gives them the freedom to offer clients bold, temporary designs for special events or home staging. The cost savings are also a huge plus. When you don't need a professional installer or materials like paste, the overall expense for a room refresh drops significantly. So, whether you're a nervous first-timer keen to try a feature wall or a seasoned renovator after an efficient fix, peel and stick wallpaper is a practical, stylish, and stress-free way to go.
Getting Your Walls and Tools Ready for Success
Before you get excited and start peeling the backing off your new wallpaper, let's talk about what really makes a peel and stick wallpaper installation look incredible. It’s not about owning a shed full of professional gear; it’s about having the right tools and a perfectly prepared surface. I learned this the hard way on my first attempt, using a butter knife for smoothing and applying it to a dusty wall—the result was, let's just say, a bit of a disaster. A little bit of prep work truly goes a long way.
The secret to a flawless finish begins with a spotless wall. The adhesive on peel and stick papers is strong, but it can’t work its magic through layers of dust, grease, or general grime. A simple wash with a sugar soap solution or a mild detergent, followed by a rinse with clean water, will do the trick. Now for the hard part: be patient and let it dry completely. Applying wallpaper to a damp wall is a guaranteed way to see it peel off later. Most brands suggest waiting at least 24-48 hours for the wall to dry out fully.
Prepping Your Surface for Perfect Adhesion
Once the wall is clean, give it a quick feel. Is it smooth? Even tiny bumps or old paint drips can show up as obvious flaws under your new wallpaper. Take a moment to fill any little nail holes or dings with spackle. Once it's dry, sand it smooth and wipe away any dust. This small effort is what creates that seamless, professional-looking finish everyone wants.
If you're working with freshly painted walls, you absolutely must wait for the paint to cure. A wall might feel dry to the touch within hours, but the paint is still releasing solvents for up to four weeks. Putting up wallpaper too early can stop the adhesive from sticking properly or, worse, pull the paint off when you decide to remove it down the track. For walls with a glossy or semi-gloss finish, a light rub with fine-grit sandpaper will give the adhesive something extra to grip onto. And if you’re covering a very dark colour or a tricky surface, a specialised wallpaper primer will create the perfect base.
The Tools You Genuinely Need
You don’t have to buy every gadget under the sun to get this right. To make things clearer, here’s a quick rundown of the gear that’s essential versus the items that are just nice to have.
| Tool Category | Essential Items | Optional Items | Household Alternatives |
|---|---|---|---|
| Measuring | Steel Tape Measure, Pencil | Laser Measure | A ruler and some string for straight lines |
| Cutting | Sharp Craft Knife or Snap-Off Blade | Rotary Cutter & Mat | A fresh, sharp pair of scissors |
| Smoothing | Plastic Smoothing Tool | Felt-edged Squeegee | A credit card wrapped in a microfibre cloth |
| Levelling | Spirit Level | Plumb Bob or Laser Level | The level app on your smartphone |
Having everything you need within arm's reach before you start saves you from that mid-project panic of trying to find a pencil. These essentials make the job much smoother, and you probably have some good substitutes already lying around your home.
Speaking of planning, getting your measurements spot-on is a big deal. To figure out exactly how much wallpaper you'll need, check out our guide on measuring for perfect results every time. It'll walk you through accounting for pattern repeats and ensure you don’t run out of paper halfway through the job.
Planning Your Layout Like a Professional
More wallpaper projects are spoiled by poor planning than any other mistake. A great peel and stick wallpaper installation doesn't start with peeling back the paper; it begins with a pencil, a tape measure, and a solid game plan. This is your chance to think like a pro and ensure your final result is seamless and stunning, rather than a patchwork of awkward offcuts.
The first thing to figure out is your starting point. It’s tempting to begin in a corner and just work your way across, but this often leads to a tiny, mismatched sliver of wallpaper right on your most prominent wall. Instead, find the room's main focal point—this could be the wall behind your bed, the fireplace, or the wall you see as soon as you walk in. By starting in the centre of this feature wall, you guarantee the pattern is perfectly symmetrical where it matters most. Any small or cut pieces will end up tucked away in less noticeable corners.
Measuring for Success and Avoiding Waste
Calculating how much wallpaper you need involves more than just the wall's height and width. You have to account for the pattern repeat—the vertical distance before the design starts over again. This detail is vital for alignment and means you'll have some unavoidable waste from each roll. A good rule of thumb is to order about 10-15% more than your initial calculations. This extra will cover mistakes, tricky cuts around windows, and pattern matching. It’s far better to have a bit leftover than to run out and find the batch colour has changed.
This is especially true for renters looking for damage-free ways to personalise their space, a trend that continues to grow right here in New Zealand. Removable wallpaper offers a non-permanent solution that protects the paint underneath, leaving no sticky residue behind. For anyone renting, this easy installation and clean removal is a major bonus. You can discover more about this trend and see some stunning insights into the removable wallpaper market.
A Practical Layout Strategy
Here’s a common scenario: you have a wall with a door and a window. How do you tackle it?
- Find your centre: Measure the total width of the wall, ignoring the door and window for a moment, and mark the vertical centre line with a pencil.
- Align your first strip: Place your first strip of wallpaper so its edge lines up with this centre line. This makes sure the pattern is balanced across the wall.
- Work outwards: Apply the next strips, moving out from the centre towards the corners. When you reach the door or window, you’ll be making smaller, more manageable cuts from a full strip instead of trying to fit tiny, fiddly pieces.
This methodical approach prevents visual chaos. It’s a key part of any successful installation, and for those specifically looking to decorate a temporary home, you might be interested in our guide on 7 renter-friendly wallpaper ideas to transform your space.
Applying Wallpaper Without Losing Your Mind
Alright, this is the moment of truth—getting that gorgeous paper from the roll onto your wall. This part is less about speed and more about finding a good rhythm. A bit of patience and a methodical approach are your best friends here, helping you avoid those moments that make you want to crumple the whole thing into a ball.
The First Strip Is Everything
Your first strip of wallpaper sets the stage for the entire project. If you get this one perfectly straight, the rest will follow suit. Start by peeling back just the top 15-20 centimetres of the backing paper. Whatever you do, don't pull the entire backing off at once; that's a one-way ticket to a sticky, tangled disaster you can't come back from. Fold the peeled section of backing paper down so it's neatly out of your way.
Line up the top edge of the wallpaper with your ceiling, leaving a few extra centimetres for trimming later. Gently press it onto the wall, aligning the side with the vertical plumb line you drew earlier. This is just a temporary placement, so don't press too hard. Step back, take a look, and if it's not quite right, simply peel it off and try again. The forgiving adhesive is a major advantage of modern wallpapers, so use it. Once you’re happy with the alignment, you can press it down more firmly.
The Art of Smooth Application
With the top of the strip secured, it’s time to get into a flow. Reach behind the wallpaper and slowly pull the backing paper downwards another 30 centimetres or so. As you reveal the adhesive, use your other hand or a smoothing tool to press the wallpaper onto the wall.
- Work from the centre outwards. This is the golden rule. Always smooth from the middle of the strip towards the edges. This pushes any potential air bubbles out to the sides where they can escape, rather than trapping them under the surface.
- Use consistent, gentle pressure. There's no need to be heavy-handed. Forcing or overstretching the material can distort the pattern, which will cause a major headache when you're trying to line up the next panel.
- Hands vs. Tools. While your hand is great for the initial placement, a plastic smoothing tool or a felt-edged squeegee is what you need to secure a firm bond and work out any stubborn bubbles.
This simple visual breaks down the core technique into three easy-to-follow actions.
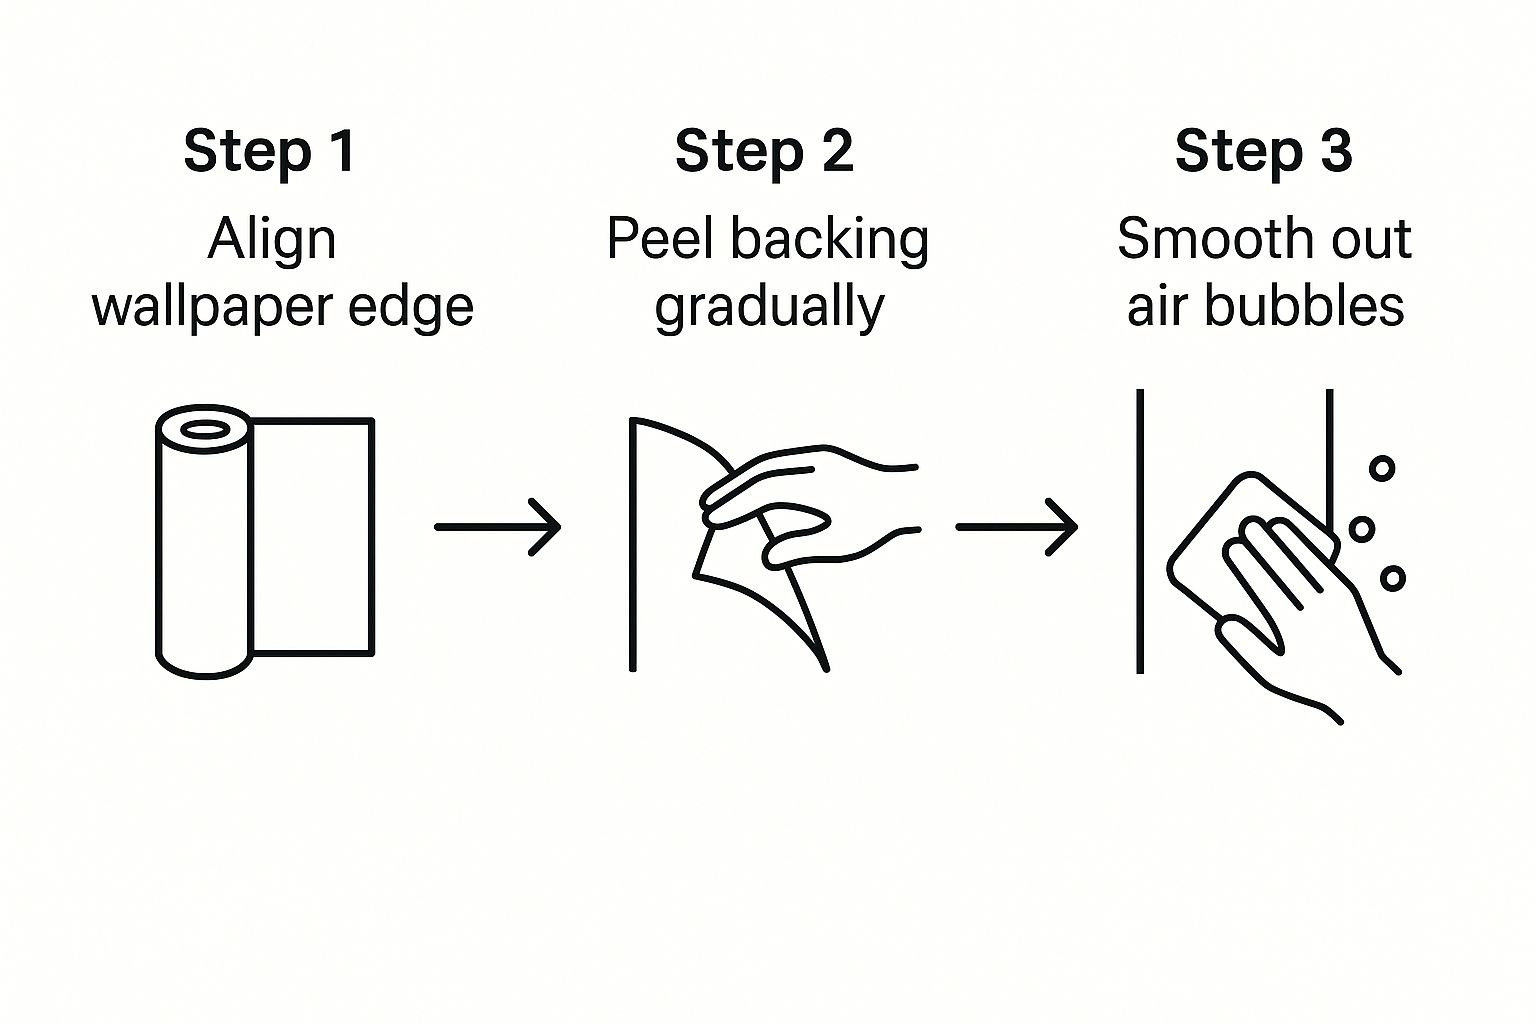
The main thing to remember is that this is a gradual process. You're not just slapping a giant sticker on the wall; you're peeling and smoothing in small, manageable sections.
When you get to tricky spots like light switches or power outlets, always turn off the power at the breaker first for safety. Apply the wallpaper directly over the fixture. Then, take your craft knife and carefully cut a small 'X' from corner to corner over the outlet. You can then trim the resulting flaps, and the switch plate will neatly cover the cut edges when you screw it back on. If you'd like a more in-depth look at the process, our easy step-by-step guide on how to apply removable wallpaper offers even more handy tips.
Perfecting Edges and Finishing Touches
Once your wallpaper panels are smoothly on the wall, it’s the finishing work that truly takes the project from ‘DIY’ to ‘professionally done’. The difference really comes down to how you handle the edges, corners, and trim. A clean, sharp cut along the ceiling or skirting board looks intentional and polished, whereas a ragged edge can cheapen the entire look, no matter how beautiful your wallpaper pattern is. This is where patience and a very sharp blade become your best friends.
Trimming for a Seamless Finish
The secret to a perfect trim isn't just about cutting; it's about the technique. Instead of simply running your knife along the edge, grab a wide putty knife or your plastic smoother and press it firmly into the crease where the wall meets the ceiling, skirting board, or door frame. This creates a solid guide. Then, run your sharp craft knife along the edge of the tool, not the wall itself. This simple trick prevents the blade from wandering and gives you a perfectly straight line every time.
Don't forget to swap out your blades regularly. A dull blade will snag and tear the paper, leaving a fuzzy, unprofessional edge. I usually snap off a new section of my blade for every major cut or two. It might feel a bit wasteful, but the crisp, clean result is worth the extra 10 seconds it takes. This small detail is a massive part of a successful peel and stick wallpaper installation.
Mastering Inside and Outside Corners
Corners can feel like the trickiest part of the job, but they don't have to be. For an inside corner, avoid trying to force a full strip of wallpaper into the crease all at once. Here’s what to do instead:
- Apply the wallpaper strip so it wraps just slightly around the corner, by about 1-2 centimetres.
- Use your finger or a cloth to smooth it firmly into the corner, making sure it sticks properly.
- Start your next strip by overlapping it directly into the corner, which will cover that small wrapped section. Use your plumb line to ensure this new piece is perfectly vertical.
The process for an outside corner is quite similar. Wrap the wallpaper around the corner, smoothing it down carefully to prevent any bunching. If a small wrinkle appears, you can often make a tiny, discreet cut with your knife to help it lie flat. Then, start your next panel right at the corner's edge. This approach keeps the pattern flowing and creates a durable, clean line.
These final touches are what bring the entire room together, turning a simple wall covering into a stunning feature. And if you're looking for more ways to bring personality into your home, you can find some great inspiration in our article on transforming your space with green home decor ideas.
Solving Problems When Things Go Wrong
Even with the most careful planning, a peel and stick wallpaper installation can sometimes hit a snag. But don't worry, there's no need to feel defeated! The brilliant thing about this type of wallpaper is that most common issues are surprisingly easy to fix, especially if you spot them early. Let's walk through the usual suspects and how to sort them out without any drama.
Dealing with Bubbles and Misalignments
There’s nothing more frustrating than stepping back to admire your work and seeing a pesky air bubble. If you’ve smoothed a panel down and a bubble stubbornly remains, resist the urge to force it out towards the edge. This can stretch and warp the wallpaper. Instead, take a small, sharp pin or the very tip of your craft knife and make a tiny puncture right in the middle of the bubble. Gently press the trapped air out through this little hole and smooth the area flat. Honestly, the pinhole will be so small it's practically invisible.
What if a whole panel has gone on a bit crooked? This is where the forgiving nature of peel and stick wallpaper really shines. Don't be afraid to carefully peel the panel straight off the wall, realign it from the top, and reapply. It’s much better to reposition it right away than to try and live with a pattern that’s slightly off-kilter. This ability to adjust is a huge part of why this wallpaper is so popular.
Lifting Edges and Pattern Mismatch
Sometimes, you might notice the edges or seams starting to lift a little, particularly in rooms that experience temperature changes, like kitchens or bathrooms. If this happens a day or two after your installation, you can usually reactivate the adhesive. Just gently warm the area with a hairdryer on a low setting, then use your smoother to press it firmly back into place.
A pattern mismatch is another hiccup that can happen, often caused by the wallpaper stretching slightly as you apply it. If the pattern is only off by a millimetre or two, you can sometimes gently lift the panel and stretch or compress the material ever so slightly to get it back on track. If the mismatch is more obvious, your best bet is to peel back the strip and start that panel again. This is where your careful prep work really pays dividends. The growing popularity of these adaptable wallpapers is part of a wider trend in home décor. In fact, the demand in New Zealand is driven by a desire for more sustainable and flexible interior design options. You can read more about the steady growth of the removable wallpaper market on Persistence Market Research.
Your Complete Installation Success Guide
You’ve made it through the key stages, so let's pull everything together into a final plan for a flawless finish. A great peel-and-stick wallpaper installation isn't about getting one single step perfect; it's about how the careful preparation, patient application, and smart finishing touches all work together. Think of it like a recipe – every ingredient and step matters for the final result.
Your Project Timeline & Checklist
Being realistic about your time is the best way to avoid getting frustrated. A simple feature wall might only take an afternoon, but a whole room with tricky windows and corners could easily be a weekend project. Don’t feel you have to get it all done in one go. Sometimes, tackling one wall a day leads to a much better, less stressful outcome.
Here’s a quick checklist to keep you on track:
- Surface Prep: Is the wall clean, totally dry, and smooth? If you've recently painted, remember to wait at least four weeks for the paint to properly cure.
- Layout Plan: Have you found the centre of your wall and decided on a clear starting point?
- First Strip: Is it perfectly vertical and aligned with your plumb line? This first piece sets the standard for the rest.
- Application: Are you smoothing from the centre outwards in small, manageable sections to avoid bubbles?
- Trimming: Are you using a fresh, sharp blade and a straight edge for those crisp, professional-looking cuts?
This historic wallpaper sample shows just how long intricate patterns have been a centrepiece of interior design.
While today's application methods are thankfully much simpler, the goal of creating a stunning, cohesive design hasn't changed a bit.
Beyond the Basics
Once you've got a basic installation under your belt, you can start getting really creative. Think about using any leftovers to line the inside of drawers, cover the backing of a bookshelf, or even create a unique piece of framed art. Each successful project will build your confidence to take on even more ambitious ideas.
Ready to transform your space with designs made right here in Aotearoa? Explore the full range of custom, eco-conscious wallpapers at Maak Home and get started on your next project today.

